
Setting a default font in Illustrator is not as easy as setting a default font in InDesign.
The trouble with the tutorials online on how to set a default font for Illustrator turned up the same answer every time: the default font would be set for just the current document. Close that document, and the default font for the next / a new document would revert back to Illustrator’s default font, Myriad Pro. Ugh. (Not that it’s a bad font, it’s just not what we want to start with.)
Through trial and error, I discovered a different method that works! I’m going to detail how easy this is to set up. It does include navigating to the Illustrator Application Support files. Not to worry! The path to this folder for both MacOS and Windows is included below.
Let’s get started!
1) Create a new document: File > New (⌘ + N [macOS] / Ctrl + N [Windows]).
2) In the New Document window, edit the “Preset Details” section on the right-hand side to match what type of preset you’re going to make, be it print or web.

3) When you’re done, click Create. You’re now looking at your new document.
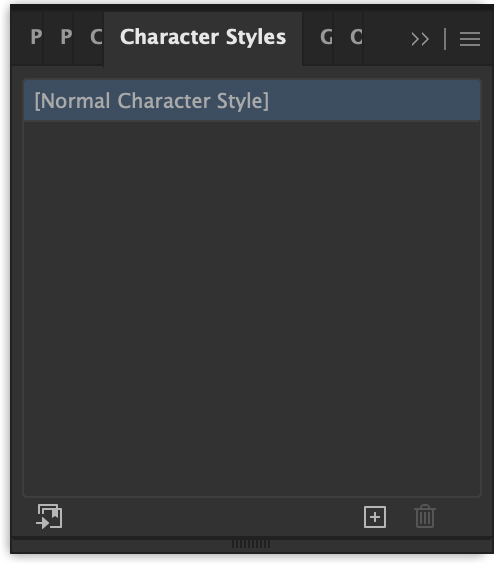
4) At the top menu bar, click Window > Type > Character Styles.
5) Double-click “[Normal Character Style]” in the Character Styles palette.
6) In the Character Style Options window, click Basic Character Formats in the left-hand sidebar.
Set your default font options:
Font Family
Font Style
Size
etc…

7) Click OK.
8) Save your document as an Illustrator .ai file, and name it something memorable / descriptive on your Desktop (for ease of locating it). NOTE: The name of this document will be the Profile option name!
9) Open a Finder window (or a new window on Windows), and navigate to:
macOS:
/Users/[yourusername]/Library/Application Support/Adobe/Adobe Illustrator XX/en_XX/New Document Profiles
Windows:
C:\Users[yourusername]\AppData\Roaming\Adobe\Adobe Illustrator XX Settings\en_XX\x64\New Document Profiles
10) Drag the .ai file that you saved in Step 8 to the New Document Profiles folder.
That’s it!
Test if this worked:
1) Open Illustrator.
2) Create a new document: File > New (⌘ + N [macOS] / Ctrl + N [Windows]).
3) In the New Document window, locate the Preset Details section on the right-hand side.
4) You may need to scroll down to the More Settings button. Click that button.
5) Click the Profile dropdown.
6) Select your new profile (the name will be that of the file you saved in step 8 of the section above).
7) Click Create Document.
8) Type something to see if the font you specified as a default font is working properly. If so, congratulations! If not, please start over with these instructions, or try closing / quitting Illustrator and reopening the app to see if that fixes it.
This isn’t quite as easy a process as setting the default font in InDesign, but it works, and there are relatively few steps involved once the Profile is set up. I hope you found this useful!